Search the Site

My Social
Meta
Powered by Squarespace

Ever since the release of the Leica M9 in 2009 I wanted one of them. But, at the time I didn't have the funds to acquire such a device…. until recent.

Last week I bought myself a Leica M9 (black) along with two Zeiss lenses and an additional battery. The glass of my (second) choice was the Zeiss Biogon 2.8/28mm ZM T* and the Zeiss C-Sonnar 1.5/50mm ZM T*. These lenses were second choice, because I'd rather had the Leica versions of those lenses, but these are kinda hard to get your hands on (extremely long waiting lists).

UPDATE: In the meantime, I acquired a 35mm Summicron-M f/2, and a 50mm Summilux-M f/1.4 Asph. The Carl Zeiss C-Sonnar 1.5/50mm ZM T* is for sale at this moment.

The following posts should represent my experiences with the Leica M system camera, and I hope to address both the good and the bad things about this legendary camera system.

Note that this 'blog' holds the oldest post first. The reason for this is that you can read it in a chronological fashion. So the updates will be at the end.

Entries by Willem (17)

Tuesday
Jun282011

Day 1: Unpacking

The unpacking was a real joy. Under every piece of carton was something hidden. Eventually all the usual things;

  • Camera
  • Battery
  • Battery charger
  • Neck strap
  • USB cable
  • Manual (multilingual)

There was also some additional stuff. Something you won't get with other camera's;

  • Adobe Lightroom v3 license voucher.
    Accessible online after registering the camera with Leica.
  • A free 6-months subscription to LFI
  • a car charger

The unpacking of the lenses was fairly normal. A box with some foam and the lenses in plastic. I must say that these lenses are absolutely gorgeous. Small, and an extremely good building quality. Even better than my 20mm Voigtländer lens (Nikon mount).

After the unpacking came: the charging of the batteries…. Should have done that the minute I got home…. Now it's off to bed.

Wednesday
Jun292011

Day 2: First Use

The experience of not being able to start using the new gear was new to me, but then again; I could have charged the batteries as soon as I got home…. which I didn't. Anyway, time to start using this Leica M9 Rangefinder camera.

The M9 is a step back if you compare its features with those of a modern digital camera / SRL;

  • No autofocus
  • No through-the-lens viewfinder (forgetting to remove the lens cap is a reality and the result is a series of black photos)
  • a very basic menu
  • incomplete / inaccurate EXIF information since the f-stop of the lens is being 'guessed' by the camera.

So, using a Leica M9 is basically stepping back into the stone ages of photography… for most of us.

Using the viewfinder needs some getting used to (understatement). The illuminated frame-lines, and other information in the viewfinder is strange. Especially, when you're used to a dSLR. But practice makes perfect, and in this case; practice is mainly getting used to the M9 interface.

Some in-house (test)shooting with the M9 showed that focussing is not that hard, but that an aperture of f/1.5 required some serious steady hands. Before you know it the focus plain has shifted a couple of centimeters. Normally not an issue but with a depth-of-field of several millimeters……. It's a whole different ballgame.

The following photo was taken with an aperture of f/1.5.

Beau

Thursday
Jun302011

Day 3: Focussing and Tripod-usage

Holding the M9 in the landscape / normal 'mode', and trying to focus on e.g. horizontal bars is hard. This has to do with the focussing mechanism of the M9. In those cases you need to rotate the M9 90 degrees to the portrait 'mode'. Doing this should make it a whole lot easier to get the horizontal bars in focus.

The M9 has a tripod mount point (screw) at the base, but since I have an Arca-Style bullhead this is not that handy. Fortunately, I still had a Wimberly Arca-style camera plate (P-5 Camera body plate) which fits just perfectly under the M9.

Sunday
Jul032011

Day 4-6: First Days in the Field

After experimenting with the Leica at home we went away for a weekend. A nice opportunity to practice a bit more with the M9. Looks like I have a problem focussing with the M9. Every single time I turn the focus ring in the wrong direction. Some investigation showed that the focus is flipped compared to the Nikon lenses. The CZ lenses turn clockwise to go from nearby to infinite, while the Nikon lenses do this going counter-clockwise. Downside to this focussing issue is that my focussing is relatively slow. Not a problem with relative static scenes, but with "moving targets" it's kinda annoying / challenging.

Difference in focus direction

Another thing I need to get used to is the light-metering of the M9. There's only one way the camera meters the light. No matrix-metering or any of that fancy stuff. Metering is done in the area around the focus area as seen through the viewfinder (center-weighted). The exposure can be locked (if you need to reframe the image) by half-pressing the shutter (similar to a (d)SLR).

Carl Ziess C-Sonnar 1.5/50mm ZM T* Bokeh test

After walking around for several hours you(r neck) really start to appreciate the weight of the M9. It's really light (compared to a Nikon D300 with a Nikkor 17-55mm f/2.8).

Deventer op Stelten - Alleyway

Tuesday
Jul052011

Day 8: Focus-Shift

No matter how extensive your research is, there's always something (bad??) you miss. In this case it's focus-shift with fast lenses. Focus-shift means that the actual focuspoint is not exactly where you might think (also known as front- or backfocus). In the case of the Zeiss C-Sonnar 1.5/50mm it occurs generally @f/1.5 or @f/2.8. My Zeiss 50mm has this 'problem' @ f/1.5, which means that the lens is calibrated for film. Problem is a big word, since it seems to be inherent to the C-Sonnar design. It's also something that occurs a lot with a rangefinder system.

To solve this, I need to focus on the ears instead on the eyes when I shoot a portrait, or just compensate bij moving a bit forward after focussing. I could have Zeiss recalibrate the lens for free (while still in warrenty), but that means shifting the problem to another aperture.

If it turns out to be a real problem, I could always go for a Leica M Summicron 2/50mm (which I have still on backorder along with the Leica M Summicron 2/35).

Friday
Jul082011

Day 11: Another Day in the Field

After the scare of the focus-shift had settled, I 'mastered' the compensation technique for this 'problem'. Turns out that moving myself about 2 inched towards the object AFTER I focussed on it, the object would be in focus (results may vary depending of the distance to the object). The further you're away, the smaller the compensation needs to be.

Both images were shot @ f/1.5 (Carl-Zeiss C-Sonnar 1.5/50mm ZM T*) with a focus distance of 2 to 3 metres with little to no compensation for the focus shift. In the first image there's a bee just left of the flower/weed.

Heathgarden in Driebergen

Heathgarden in Driebergen

Thursday
Aug042011

Day 28: Recap of the Days Gone By

It's has been a couple of days since my last update. I haven't been able to shoot that much (in general) due to work and other (social) events. This post will hold several photo's I made with the M9 in the 20+ days I didn't report back here. During this period I also sold a lot of my Nikon gear. Especially most of the prime lenses I owned. Since I have the M9 now, I doubt that I will have much use for those primes. I will hold on to the Macro lens and my two zoom lenses (the Nikon 17-55 f/2.8 and the 70-200 f/2.8).

The Panasonic G3 I won with a photo contest is also gone (SOLD!!!). This camera was a real beauty, but I had no use for it. It's situated between a compact camera and a dSLR. The two camera types I have (Nikon P7000, and a Nikon D300) are more than sufficient for me. Overkill might be a better word.....

Back to the Leica M9 adventure....

Click to read more ...

Saturday
Sep032011

Chromatic-Aberrations ...

is something even the Carl Zeiss lenses seem to suffer from.

CA With Zeiss C-Sonar T* 1.5/50 ZMGood thing that CA doesn't show up after you convert the image to black and white.

Same image, but in black and white

More photos can be found on my SmugMug page.

Monday
Sep192011

SanDisk Memorycard Issues with the M9

Everyone following the latest Leica M9 news, knows that there are some issues with the Leica M9 and certain SD memory cards. Worst-case scenario is that you didn't record a single photo in a whole day shooting.... The (visual) symptom is that the red light on the back of the M9 keeps flashing (and flashing, and flashing), and that the camera locks up eventually.

To resolve this, you need to remove the battery fro the M9, and re-insert it. After that you can see what the last properly recorded photo was, and hopefully, it wasn't a photo you made last month....

Today I noticed a little side-effect from this behavior; It seems that the filenames recording lags behind as well. After the SD card error, I changed to another SD card, and resumed shooting. At home I noticed that a lot of my photos had a '-2' in the filename after the import in Lightroom. So I guess that the M9 forgot to count/remember the earlier filenames that did made it to the disk, and started with a (incorrect) 'last-known-good' filename number on the new card. Might be that this doesn't occur on the original card, since the camera should see that the filename is already taken, and it increases the filename count. It could also be that it just overwrites a properly recorded image before going bad. -> mental note for the future.

This camera still amazes me in images quality etc. (which is good), and in buggy software (which is bad of course).

Leica M9, Carl Zeiss Sonnar T* 1.5/50mm ZM @ f/1.5

Wednesday
Sep212011

Cleaning the Leica M9 Sensor

The last couple of days, I noticed those well known dust spots in my photos. So time to clean the camera. I already tried the blowing technique with a Giottos Rocket-Air blower. This usually does the trick, but not this time.

Checking for dust on the sensor is done by using the following procedure;

  • Use a small aperture on the camera (f/11 or smaller)
  • Overexpose the image  by 1 or 2 stops (by using exposure compensation)
  • Take a photo of a white piece of paper. No need to keep the camera stable, because the dust ain't moving anyway.
  • Check the photo for spots by zooming in on the LCD screen on the back, and move the around. The dust spots should be very visible this way.

So, it's operating time:

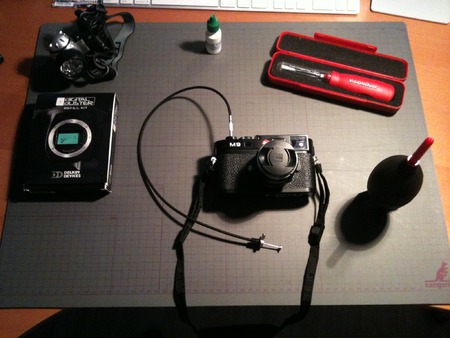
Leica M9 and the Cleaning SetItems used are (clockwise): cheap-ass headlamp, VisibleDust cleaning fluid, VisibleDust Arctic Butterfly, Giottos Rocket-Air blower, the patient (with lockable cable release to be used with the Bulb setting on the camera), and Delkin full frame swabs.

First I tried the Giottos Rocket-Air blower to remove the dust. Result; nothing... Next up; the Arctic Butterfly. Still dust visible on the photo's. So, one option left; wet cleaning.

I used the full frame swabs from Delkin, but even though these are specially made for full frame sensors, I found the maneuvering in the camera housing troublesome/cramped. Also, it seemed that more dust was getting on the sensor by using these swabs. After two tries I quit using these swabs, and got my crop sensor swabs from VisibleDust out. I used those before on my Nikon D300 (with success). The advantage of these swabs is that they are smaller, which gave me more room to maneuver in the camera housing. And guess what; the dust was gone after the first swipe.

Excellent!!

For those who are wondering about cleaning their camera; there's not really much to is. As long as you prepare yourself, and use the right tools.

  • When you have dust in your up-right corner on the photo, it means that the dust on your sensor is on the lower-left part (when you're looking in the sensor housing). The image you see through the lens / view-vinder is flipped horizontally, AND vertically on the sensor. This helps in determining where to put your cleaning efforts.
  • Make sure you have a way of locking the shutter when performing the cleaning. I can't image what will happen to the shutter, when your swabbing the sensor and your finger slips of the shutter release. I always use a lockable cable-remote.
  • Use a (Rocket) blower to remove the dust particles that are not stuck (glued) to the sensor.
  • Try a Butterfly-like brush to remove the particles that not that stuck. Problem is, you don't know if they will come loose.
  • Finally, use the wet method.