Cleaning the Leica M9 Sensor
 Wednesday, September 21, 2011 at 20:01
 The last couple of days, I noticed those well known dust spots in my photos. So time to clean the camera. I already tried the blowing technique with a Giottos Rocket-Air blower. This usually does the trick, but not this time.
Checking for dust on the sensor is done by using the following procedure;
- Use a small aperture on the camera (f/11 or smaller)
- Overexpose the image by 1 or 2 stops (by using exposure compensation)
- Take a photo of a white piece of paper. No need to keep the camera stable, because the dust ain't moving anyway.
- Check the photo for spots by zooming in on the LCD screen on the back, and move the around. The dust spots should be very visible this way.
So, it's operating time:
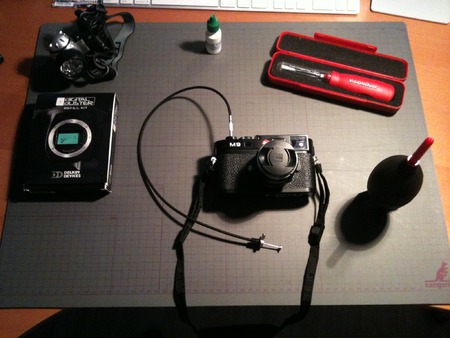
 Leica M9 and the Cleaning SetItems used are (clockwise): cheap-ass headlamp, VisibleDust cleaning fluid, VisibleDust Arctic Butterfly, Giottos Rocket-Air blower, the patient (with lockable cable release to be used with the Bulb setting on the camera), and Delkin full frame swabs.
First I tried the Giottos Rocket-Air blower to remove the dust. Result; nothing... Next up; the Arctic Butterfly. Still dust visible on the photo's. So, one option left; wet cleaning.
I used the full frame swabs from Delkin, but even though these are specially made for full frame sensors, I found the maneuvering in the camera housing troublesome/cramped. Also, it seemed that more dust was getting on the sensor by using these swabs. After two tries I quit using these swabs, and got my crop sensor swabs from VisibleDust out. I used those before on my Nikon D300 (with success). The advantage of these swabs is that they are smaller, which gave me more room to maneuver in the camera housing. And guess what; the dust was gone after the first swipe.
Excellent!!
For those who are wondering about cleaning their camera; there's not really much to is. As long as you prepare yourself, and use the right tools.
- When you have dust in your up-right corner on the photo, it means that the dust on your sensor is on the lower-left part (when you're looking in the sensor housing). The image you see through the lens / view-vinder is flipped horizontally, AND vertically on the sensor. This helps in determining where to put your cleaning efforts.
- Make sure you have a way of locking the shutter when performing the cleaning. I can't image what will happen to the shutter, when your swabbing the sensor and your finger slips of the shutter release. I always use a lockable cable-remote.
- Use a (Rocket) blower to remove the dust particles that are not stuck (glued) to the sensor.
- Try a Butterfly-like brush to remove the particles that not that stuck. Problem is, you don't know if they will come loose.
- Finally, use the wet method.


